Showing posts with label graphics. Show all posts

Handy Tips To Be More Productive Using GIMP

GIMP logo
GIMP - also known as the GNU Image Manipulation Program - is well known as an excellent graphics editor. Many people even consider it as useful as Adobe Photoshop for creating images for the web. I have been using GIMP for a long time now and have used it for such tasks as screen capturing, optimizing images, retouching photos, scaling images, special effects and so on. GIMP is available for multiple platforms including Windows, Linux, and Mac OS X. Why, GIMP is even available as a portable application  which allows you to run it directly from a USB pen drive.

The following are a few handy tips which will help you be more productive in GIMP.


Handy Tips for GIMP users

  1. Add the PSPI plugin - This plugin will allow you to install and use most Photoshop filters in GIMP.
  2. Install the Layer effects plug-in  - This plug-in will club filters such as drop shadow, color overlay, bevel and embross, inner shadow, inner glow and so on into one group thus easing your work.
  3. Install the Separate+ plug-in which will bring CMYK color separation in GIMP.
  4. Install the Liquid Rescale plug-in.
  5. Add additional brushes. GIMP already comes with a default set of brushes but you can download more variety from websites such as blendfu.com.
  6. Anchor the windows - There is an always on top option for GIMP dialog windows. Use them to your advantage.
  7. Install the GIMP Animation Package (GAP) - Helps you create animated GIFs, surrealistic landscapes and realistic water motion.
  8. Enable GEGL in GIMP. This feature is available only in GIMP 2.6 and above.
[Source: Smashing Magazine]

GIMP 2.7.0 has been released

GIMP version 2.7.0 has been released. GIMP 2.7 is the first step towards GIMP 2.8 which will be a stable release. GIMP follows the Linux kernel approach to version numbering in that all odd numbered versions are unstable and even numbered versions are considered stable.

Some of the notable features in GIMP 2.7.0 are as follows :

  1. Text editing with text tool is done in the canvas like you do in Adobe Photoshop and not in a separate window.
  2. Tag support for brushes and patterns. And you can even filter these resources based on the tags.
  3. You can save your images in only one format namely the native GIMP file format (XCF). If you want to save in a different file format such as PNG or Jpeg, you have to use the "Export" feature.
  4. GIMP now supports rotating brushes.
  5. Additional features of GEGL incorporated.
  6. A new plugin for loading Jpeg2000 images.
Complete list of changes can be found at developer.gimp.org.

Please note that GIMP 2.7 is a development release and is considered unstable. However, if you decide to install GIMP 2.7 in Linux, you have to compile it from its source code which can be downloaded at ftp.gimp.org.

GIMP team also rolled out GIMP 2.6.7 which provides lots of bug-fixes, and it contains an important fix for using GIMP with the latest GEGL and babl releases. Read the full release notes for GIMP 2.6.7.

Announcing the winners of the Oxygen Wallpaper Contest

In August this year, the Oxygen team which are behind the famed Oxygen icons unveiled the Oxygen wallpaper contest. And the formal results are out. The response of the contest was supposedly overwhelming with over 2000 stunning photographs submitted by numerous KDE enthusiasts.

In an earlier post, I had talked about the work of Vlad Gerasimov and his stunning wallpapers. Well two of his entries (EOS and Emotion) have been selected to be included in the default set of wallpapers to be shipped with KDE 4.0. And of the two he submitted, one of them (EOS) has been chosen as the winning wallpaper. Um... I like the other one (Emotion) better, though I am happy the color is blue because blue is pleasing to the human eyes.

Fig: Winning wallpaper which will be the default in KDE 4.0

Many wallpapers in the final selection are stunning photographs of nature, flowers and animals. Do check out the complete selection of wallpapers destined to be shipped with KDE 4.0. Boy, I am brimming with anticipation of the treat that is in store for Open Source enthusiasts when KDE 4.0 is finally released.

Sexy Wallpapers for your Linux desktop

Any time you want to spruce up your mind while you are shackled to your computer, try changing the desktop background image to something pleasing to you. It will make a visible difference to your mental setup. It works every time for me. Some of the themes which lifts my mind when it is bogged down with work are nature themes, abstract art and beautiful cute looking wild animals.

A good wallpaper should work in making your computing experience a tad lighter without being a distraction.

Vlad Gerasimov runs his own design company called Vladstudio which specialize in web design and development, database-driven sites, skins, icons, logotypes and collateral graphics. In his spare time, he is in the habit of creating beautiful looking wallpapers which he then makes available to all in different screen sizes to adorn your desktop including for dual monitors.

He is also purported to be a contestant in the Oxygen Wallpaper contest.

Of his diverse set of wallpapers, I do like the ones shown below. They are quite pleasing without being an eyesore.


AMD / ATI release Linux drivers for their popular graphics cards

It is a common perception among Free software enthusiasts that AMD's acquisition of ATI bodes really good for Linux and Free software. This perception is bang on target because AMD has promised that it will be eventually providing open source drivers for all its graphics cards. Just yet, AMD/ATI has released Linux drivers for its popular range of graphics cards namely ATI Catalyst 7.10 graphics drivers.

So what is so unique about the ATI Catalyst ? Well, ATI Catalyst is a unified software suite which delivers a full software solution for supported Microsoft Windows and Linux operating systems. And AMD/ATI claims that all ATI products use the same Catalyst driver ensuring all products take advantage of the incredible performance, stability, innovative features, and visual quality that the Catalyst software suite have to offer. The latest version of ATI Catalyst is 7.10. It has support for AIGLX and ATI GPUs which translates to enhanced performance in playing 3D games such as Quake and Doom.

Fig: ATI Catalyst driver architecture

If you own a ATI graphics card, you may download the driver suite for Linux from AMD's official website. Of course, this driver has not yet been released as open source and is as proprietary as the Nvidia drivers. But with AMD in charge, one can say with certainty that ATI has become a lot more Linux friendly than it was before its acquisition.

Liquid rescale feature now available as a GIMP plugin

One month back I had written about a content aware image rescaling technology. And I hoped that this technology will be incorporated in Gimp in the future. Well we didn't have to wait that long.

A liquid rescale GIMP plugin has already been released and you can download the source as well as binaries for a variety of Linux distributions and for Windows at the following location. The download link of the Windows version of the GIMP plugin does not seem to work so I found an alternate location here.

You can download and install this plugin and take it for a run.

Once you install the plugin, you can access it in GIMP by navigating to layer -> liquid rescale.


Fig: Liquid rescale plugin dialog box in GIMP

Possible uses of the liquid rescale plugin
  • Rescaling a 1600 x 1200 px wallpaper image to a smaller diamension (Eg: 800 x 600) without losing its clarity.
  • Reducing the size of an image without losing any important parts.

A talk with Pavel Kanzelsberger, Creator of Pixel

You say you do not know what Pixel software does ? Well it is the end result of a one man company's remarkable achievement in developing a graphics software at par with Photoshop. The person in question is Pavel Kanzelsberger from Slovakia who has single handedly developed this software. I may add that it is not a GPLed product rather it is as closed source as Photoshop. Its USP is that it has a native Linux build and runs on numerous other OSes as well. And then again it doesn't cost you a hand and a foot to acquire it as it costs far less than Photoshop and is pegged at just $38 .

At present Pixel is still in the beta stage but is quite usable. A glance at the user interface of Pixel will give you a clue as to where it takes its inspiration from . It has the exact interface of Photoshop - an aspect that Adobe should be worried about especially since this product works flawlessly as well and is getting better as days go by. Check out the screenshots of Pixel.

James Gray at Linux Journal quizzes Pavel Kanzelsberger about what motivated him to start working on this project, the development process, a little about the person himself and the future of Pixel. Do read the interview.

Image Retargeting - A new technology to display images on the web

Displaying images on the web is always a case of walking the fine line between optimizing the image for the web and making sure the image doesn't lose its clarity or its intended purpose. There are two ways of resizing an image which is popularly used by web masters and lay persons alike. They are cropping an image and scaling an image to the desired size. The former method will most possibly end with the image losing its fine details where as using the latter method will reduce the image's clarity.

Now it seems a new method of resizing an image has been demonstrated by two Israeli professors, Shai Avidan and Ariel Shamir which ensures that the image retains both its functionality as well as its clarity. This method is called re-targeting. The idea is to algorithmically determine which areas of the image are important and then delete other areas retaining those which are important.

Fig: Re-targeted vs cropped vs scaled image

At present none of the graphics suites including Photoshop and Gimp provide tools to re-target an image. Perhaps if this new algorithm (or method) is released under an open license, we could see this functionality being incorporated in Gimp in the future. You can read more about this new method here (PDF document). It is popularly known as 'Seam Carving for Content-Aware Image Resizing'.

For now watch this Youtube video which explains this interesting process in more detail.

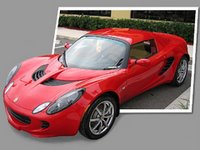
A step by step tutorial on creating a 3D effect of a photograph using Gimp

Gimp is a versatile image editor. I have been using Gimp exclusively for editing images and photos targeted for the web. Over and above its usefulness, it is also a Free software. But when it comes to finding tutorials in creating special effects of photographs, you find a whole lot of them for Adobe's Photoshop but not that many for Gimp. This could be because there is a whole industry that has been spawned by Photoshop and which depends on it for its survival.

For instance, there are a plethora of books on Photoshop, professional videos, exclusive Photoshop training institutes and even Photoshop magazines. Compared to that, Gimp lacks any of these baring a couple of books which can be counted with your fingers. But one thing which Gimp has as much as Photoshop is a very strong community backing it, a community which understands the true strengths of this Free graphics suite and use it exclusively for creating and editing images targeted for the web.

In recent times, with GNU/Linux and Free software getting increasing exposure among the masses, some of it has also rubbed off Gimp and now you find more tutorials on accomplishing special tasks using Gimp than you found earlier.

Andrew of 'Instructables' fame has written an excellent tutorial which shows how to create a 3D effect from a photo of a car which is really informative. But what is even better is that for a change, he explains how to do it using the Free software Gimp.

Image manipulation using Image Magick

In an earlier post, I had reviewed Gimp - a robust image manipulation software which is installed by default in most Linux distributions. Gimp can no doubt be held at par with the industry leader Adobe Photoshop at least in creating images for the web. But sometimes a situation arises where it is not feasible to use a GUI based software to modify images; perhaps because the machine does not have a running X server or you need a tool which allows you to do batch conversions of 100s of images to the required size.

Fortunately, there is a very powerful suite in Imagemagick. I call it a suite because it is actually a collection of tools (11 to be exact), each of which accomplishes a particular task. These tools are as follows:
  • animate - This tool can be used to create animated Gifs.
  • compare - This is used to mathematically and visually show the difference between two images.
  • composite - Used to overlap one image over another.
  • conjure - This tool is used to execute scripts written with the special scripting language called Magick Scripting Language.
  • convert - This is a versatile tool in that apart from using to convert between a variety of image formats, it can also used to do many image manipulations like crop,blur, join two images and so on.
  • display - Shows an image on any X server.
  • identify - displays the properties of an image including its size, dimentions and type of image.
  • import - This is an interesting tool to capture screenshots of the desktop or even the console if one is working in the console. The output can be saved even in postscript format.
  • mogrify - The use of this tool is similar to the convert tool but with one difference in that mogrify will overwrite the current image where as convert will write the result into a different image.
  • montage - create a composite image such as providing a border to the image, placing text and so on.
  • stream - a lightweight tool to stream one or more pixel components of the image or portion of the image to your choice of storage formats.
I usually use Gimp for all my image editing needs and so am not so fluent in using Image Magick suite. Carson McDonald has put together a very interesting tutorial in using two of the tools (convert and montage) in the Image Magick suite to illustrate some of the special effects.


Copyright © Sun solaris admin